Communities & Memberships
How to Delete a Facebook Group in 5 Easy Steps
The reasons to delete a Facebook Group have been building. But deleting your Facebook Group is more than the mechanics. You need a strategy for your moving your community. Now you have one.
Author
Mighty Team
Last Updated
October 23, 2025

Table of Contents
Let’s get this out of the way upfront. Here are Facebook’s own instructions for how to delete a Facebook Group. The headline from that article? Unsurprisingly, Facebook makes deleting a Facebook Group pretty hard, but not impossible.
There are usually two reasons to delete a Facebook Group: because you’re group is failing or because it’s succeeding. In this article, we’ll cover how to delete a Facebook Group on both web and mobile. We’ll also walk you through how to delete a Facebook Group if you’re migrating somewhere else.
Try the platform with the most $1 million communities.
Why delete a Facebook Group?
There’s no engagement.
It doesn’t fit your brand anymore.
You've outgrown it.
You’re migrating to another platform.
You need features it doesn't have.
You have security or privacy concerns.
How to delete a Facebook Group
How exactly do you go about deleting a Facebook Group? If it was just as easy as clicking a big “Delete” button, you would have done it already. Unfortunately, deleting a Facebook Group is a bit more involved than just hitting “Delete.”
Here’s how to delete a Facebook group on a browser
Step 1 - Go to your member section
Click the “Members” tab and you’ll find a list of your members. You need to delete these members one by one–yup, that’s right.
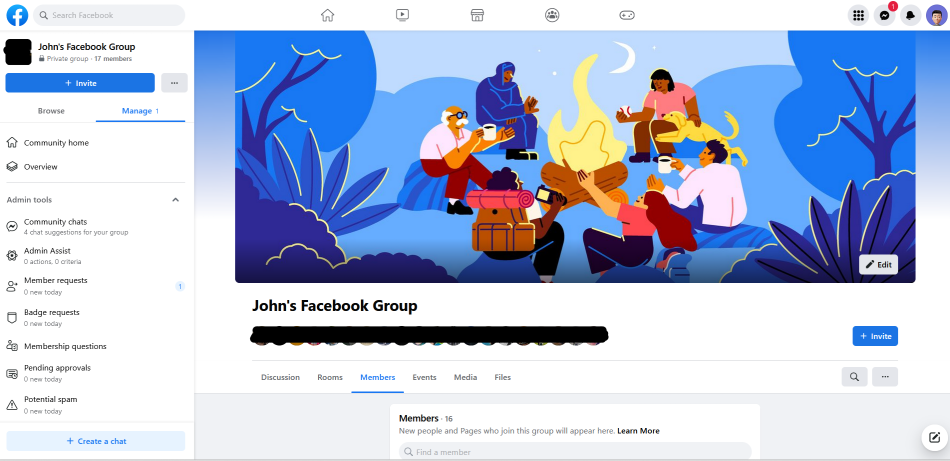
There are some browser extensions that will delete all the members at once if you want. But unless your group is enormous it probably makes more sense to do it Facebook’s way.
Step 2 - Find the 3 dots next to the member’s name
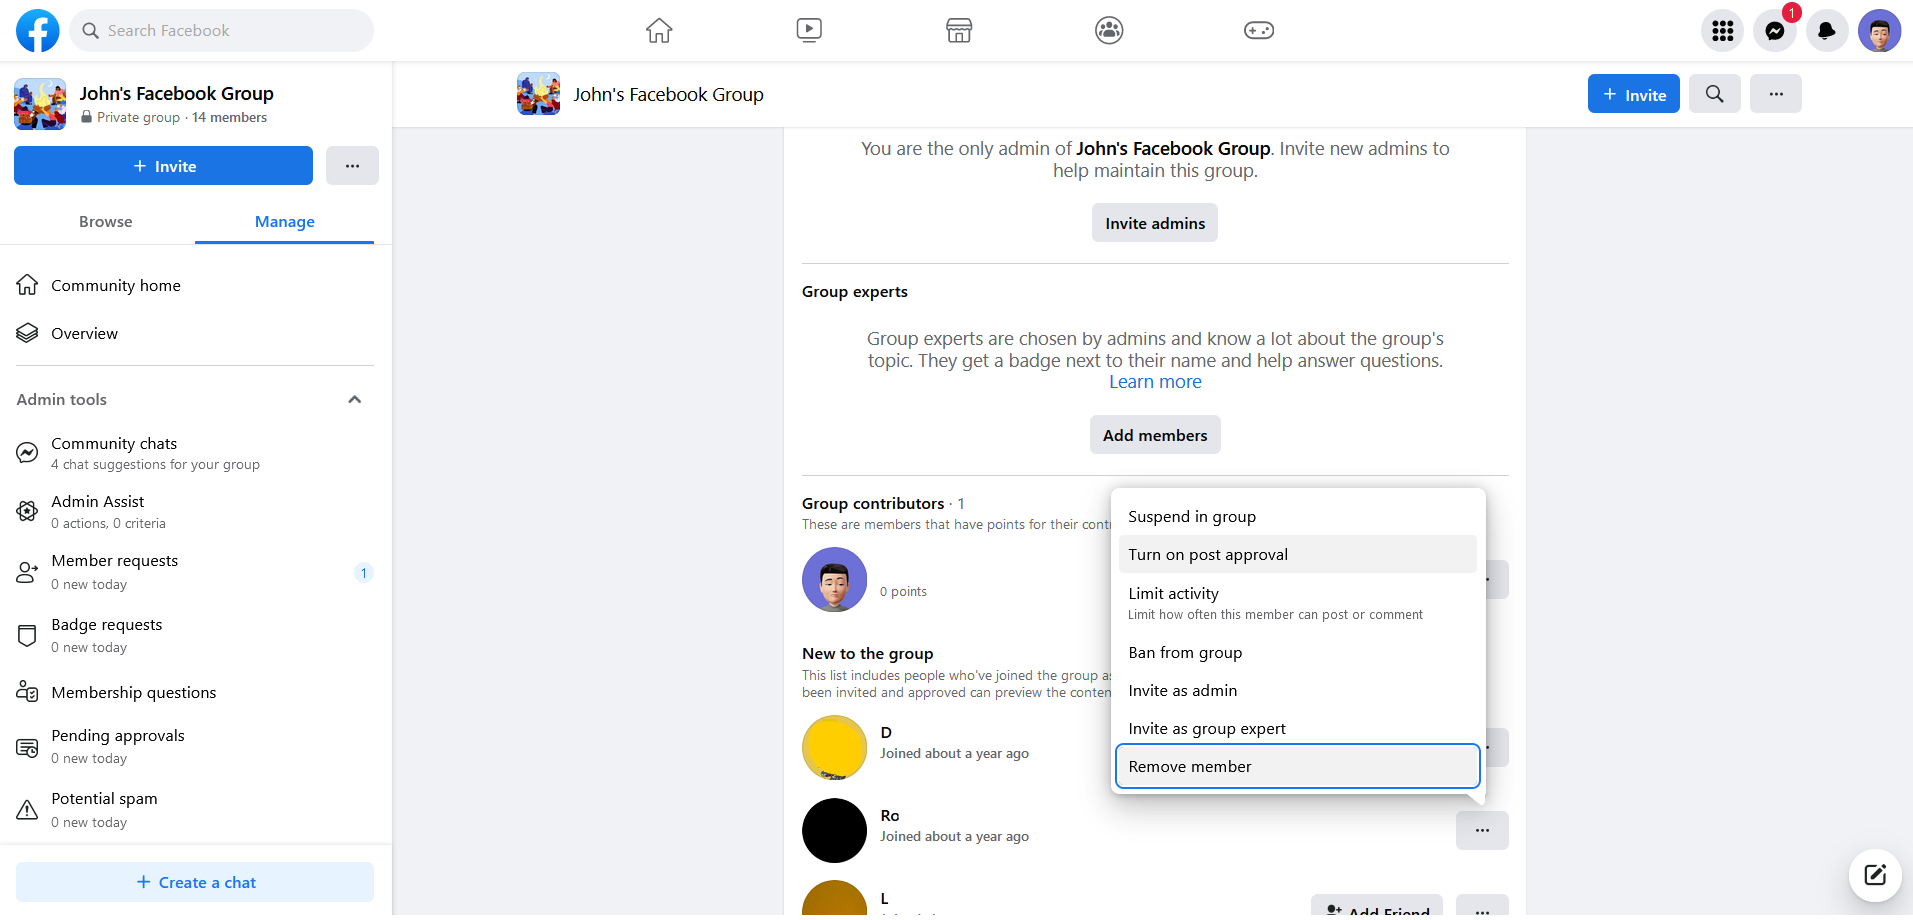
Step 3 - Click “Remove Member”
Once you click "Remove Member" you'll also get the chance to block members from coming back or from joining other groups. Since you're deleting the group, you can just ignore these and click "Confirm."
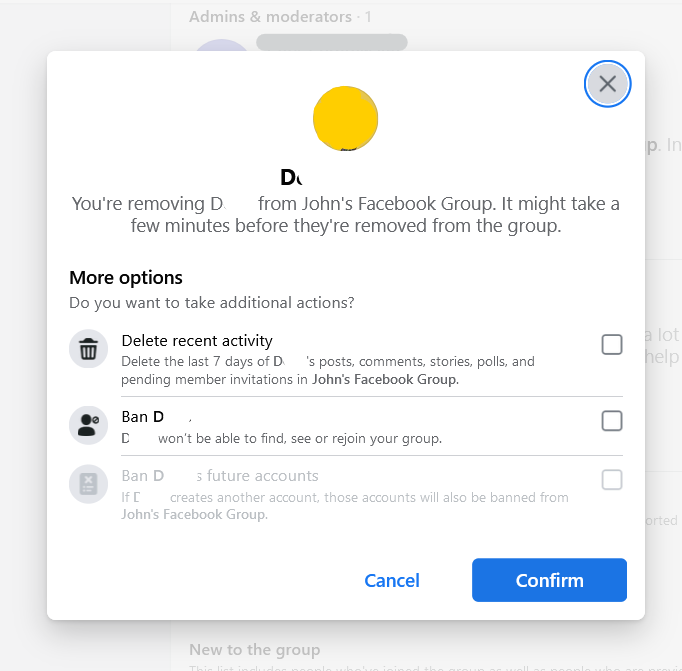
Step 4 - Repeat this for every member
Do the same thing for each member until it's just you left in the group.
Step 5 - Once it’s just you, you can delete the group
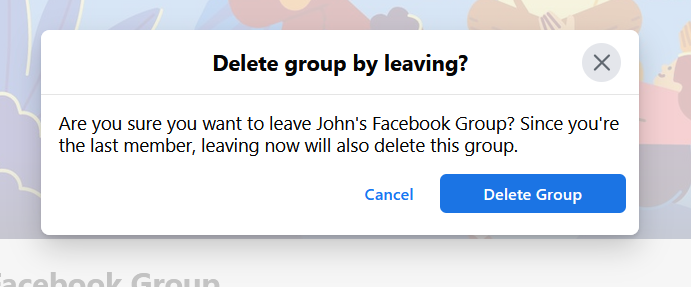
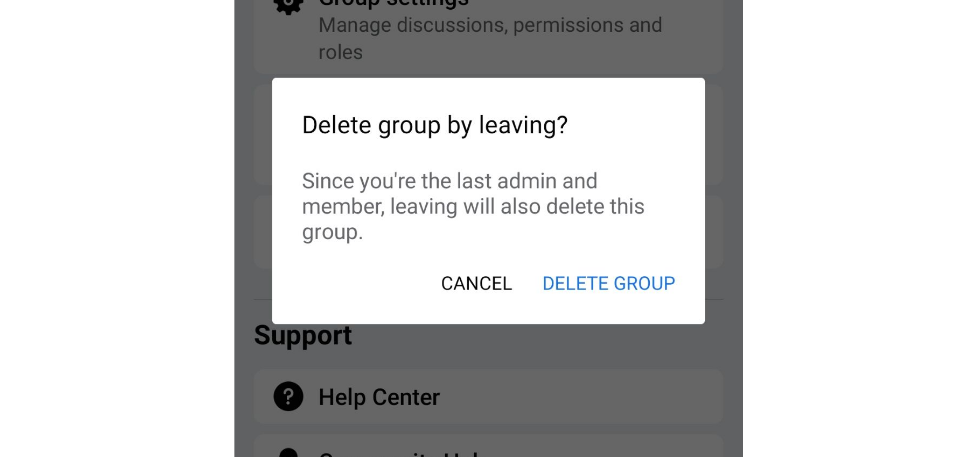
Once you’re the last person in your Facebook Group, you can leave it yourself. And since leaving mean there’s nobody there, you “delete the group by leaving.”
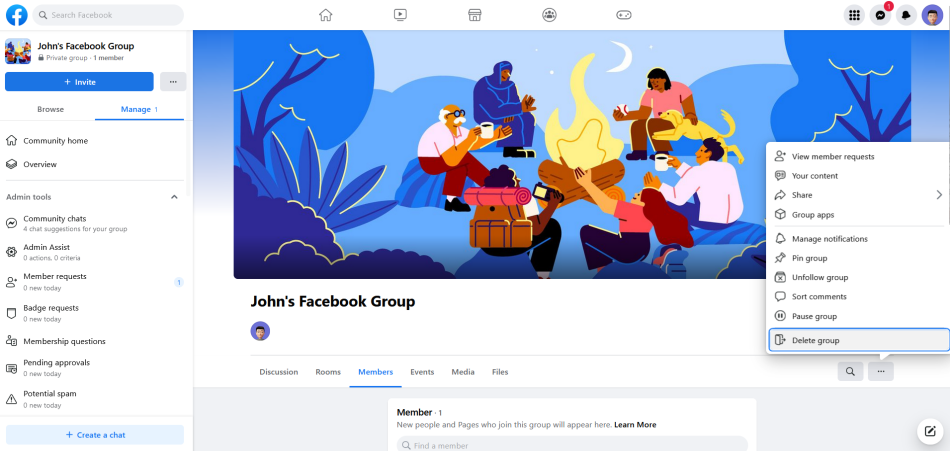
So at this point, Facebook will give you a “Delete” button. You can confirm the delete, and you're done!
Here’s how to delete a Facebook group on a mobile device
Step 1: Remove everyone in the group until it's just you
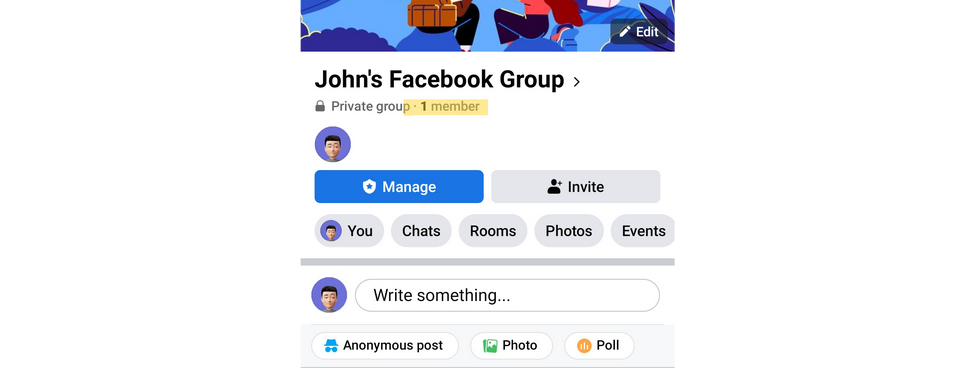
Step 2: Click on the "Manage" button
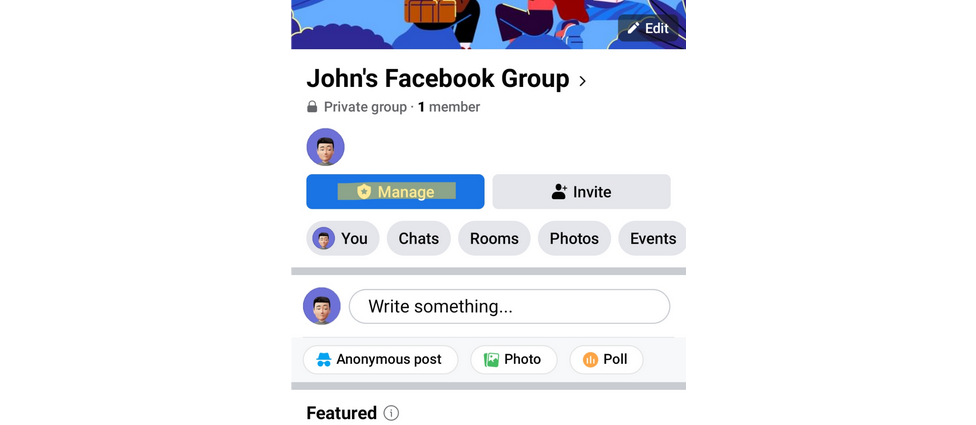
Step 3: Scroll down to the "Delete" button
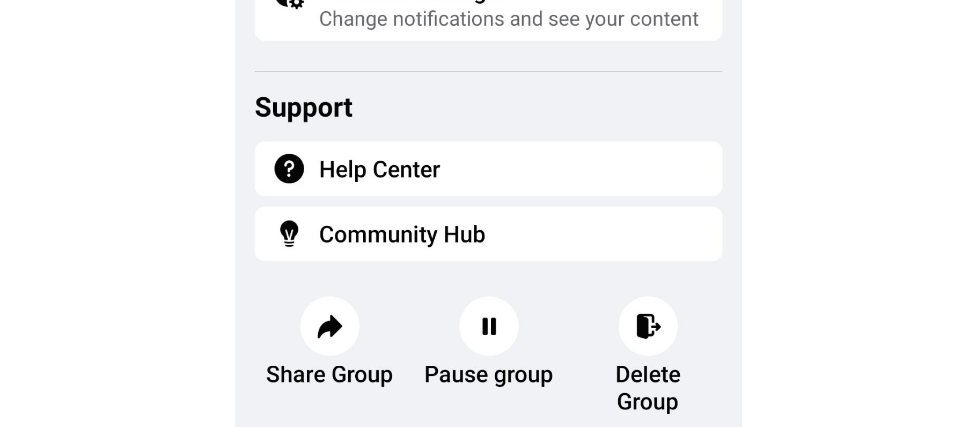
Step 4: Confirm the delete
How to delete a Facebook Group and migrate
There are two primary reasons for deleting a Facebook Group: it’s not working or it is working. If you’re deleting the Facebook Group because you’re shutting it down and moving to a new platform, here’s how.
If you’re not sure where to move, check out our guide to alternatives to a Facebook Group.
Step 1: Know why you're deleting your Facebook Group.
What are some of the most common reasons for deleting a Facebook Group and moving elsewhere? Here are the top 3:
The noise, clutter, ads, and unpredictable algorithm on Facebook are a massive distraction to members trying to focus on their goals. If you’re building a paid membership or a thriving community, it’s better to choose a dedicated community platform and ditch the distractions.
You as the Group Admin can’t reach all of your members predictably or consistently. For Facebook, a Facebook Group isn’t yours, it’s theirs. It’s up to them (not you), who sees what in your Facebook Group.
You’re mixing Facebook Groups with 5 other platforms. A separate email provider, website, and online course platform with a Facebook Group tagged on. It’s bananas.
You want better results. When you can offer an equally compelling and engaging community under their own brand versus Facebook’s, the choice is clear (especially when they can offer it instantly on every platform, web, iOS, and Android).
While Facebook’s questionable practices and policies have caused many to delete Facebook, as a Group Admin, you don’t just want to be leaving Facebook. You want to be going somewhere better.
Step 2: Prepare to delete your Facebook Group
Start the conversation in your Facebook Group to get people prepared for the move. Here are some ideas you can plan to make the jump:
Have a countdown to the move.
Invite people to the new platform.
Invite people to a launch event on your new platform.
Have a special offer for members who make the jump (if it’s a paid community).
Set a clear shut-down date and stick to it.
Step 3: Choose a new platform for your Facebook Group.
If you’re wondering how to build an online community on a platform that’s NOT Facebook, here are some of the features to watch for:
Discussion forums, chat, and messaging
Content options (+ ways to organize)
Events and livestreaming
Courses (live and pre-recorded)
Payments (memberships, sales, bundles, etc.)
Great apps (and branded mobile apps)
Basically you want all the good things about Facebook, while improving on the stuff that doesn’t work.
Step 4: Set the deadline
Armed with your written reasons, support squad, and chosen platform, you’re now ready to announce that you’re deleting your Facebook Group. The best timing for making an announcement like this is to give yourself 2 weeks and roughly 8 reminders to make a smooth transition.
Once the deadline arrives, stick to your guns. Delete it. Your new group can’t thrive if you’re trying to be in two places at once.
Step 5: Delete your Facebook Group.
The last step is to delete your Facebook Group. Follow the steps above and make it happen.
Ready to build a real community?
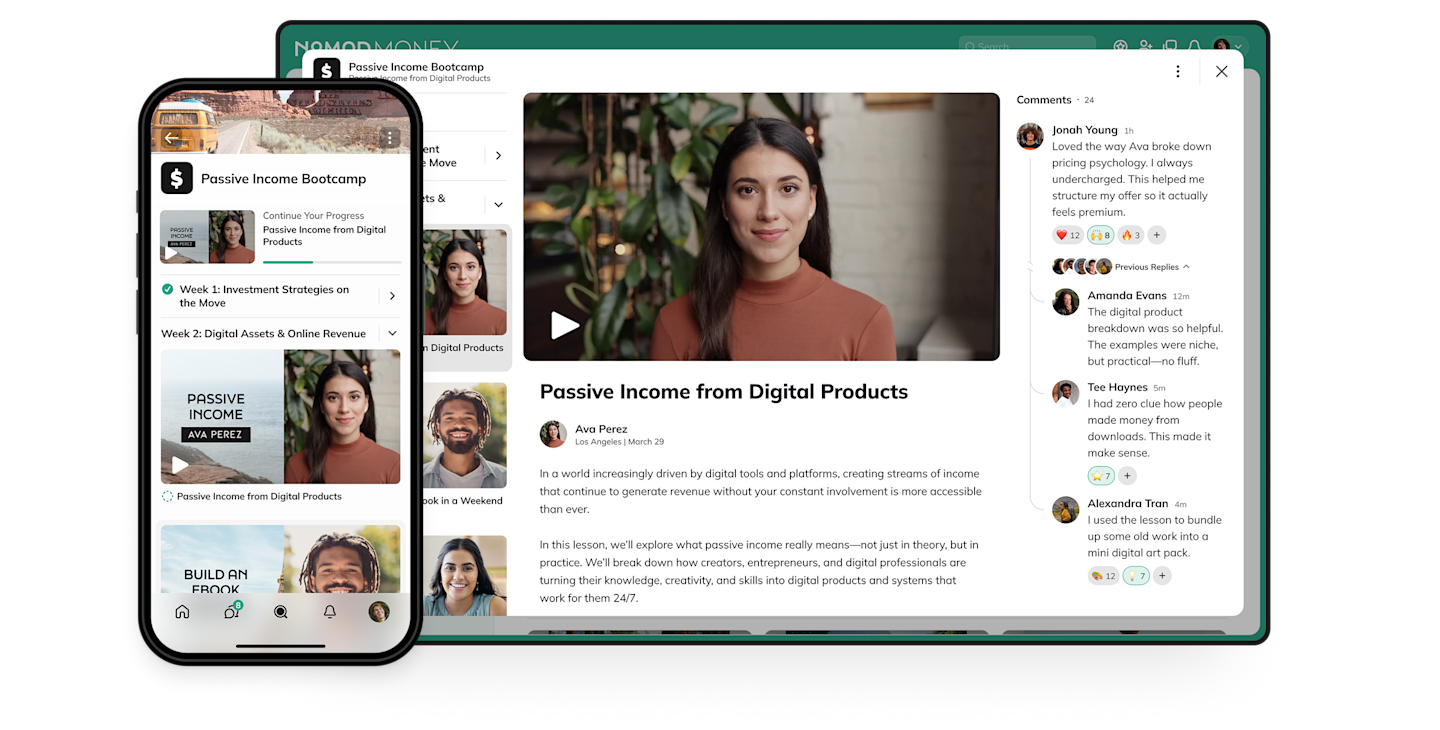
If you want a community platform that will let you grow a membership business or thriving community, come build on Mighty!
Our community platform mixes discussion forums, chat & messaging, content options, livestreaming, events, and courses--with a functionality Facebook Groups just don't have.
Don't take our word for it. Try it free for 14 days!
FAQs
1. Archive vs. delete: What’s the difference?
If you archive a group, it’s not visible. But it’s still there. You keep your admin access. If you change your mind, you can pull a group out of archive status and activate it again. If you delete a group, it is set for permanent removal 30 days after you delete it. Once it’s gone, it can’t be brought back.
Bottom line – Archiving can be reversed, deleting is not.
2. How do I communicate the shutdown to members?
Here are some ideas for communicating a shutdown to your members.
Create a post announcing the shutdown, at least 2 weeks in advance. If you are moving a Facebook group somewhere else, put directions there in each post!
If you are admin of a group with fewer than 20,000 members, you can notify the entire group by tagging them with [AT]everyone. They’ll get a ping notification.
Explain why you’re closing the group. If you’re moving, explain why you’re moving. Explain what your new platform will give you that Facebook isn’t.
If you have other access to your group members (e.g. email), then use that to notify them too!
Thank members for their participation and for making the group work.
If your group isn’t too big, you could personally message members to invite them to a new space. OR you could message new members.
3. What are some deletion roadblocks?
Deleting members: You need to delete everyone in the group. Click the three dots beside each name to delete them. It’s annoying, but necessary.
Unlinking any Pages or Shops: Anything linking to your Facebook Group needs to be either deleted or unlinked.
Removing other admin: Remove any other admin (they can also block deletion if you leave them).
Deleting membership requests: Remove, delete, and deny any existing membership requests. OR, you can let them in so that they can see directions to your new community space.
Deleting any existing scheduled content: Make sure there’s nothing upcoming.
Downloading any important content: If there are images, posts, etc. you’d like to keep, make sure you have a record of them.
4. What happens after deletion?
Immediately, Facebook takes a record of your deletion request and archive the data temporarily. After the 30-day grace period, all posts, comments, photos, videos, and member lists are deleted off of Facebook’s servers. It may take time for the pages to disappear off of Google as the older images might be cached in the search engine’s records.
5. What are alternatives to deleting a group?
Here are 5 great alternatives to deleting a Facebook group, if you are inclined.
Start a new membership site and make the move from a Facebook group to a private–and maybe even paid–community.
Create a spin-off product or experience like an online course, an event, or a mastermind group.
Archive the group while taking the time to figure out if you still want it or not.
Pass administration of the group to a trusted member who can carry it forward.
Sell the group privately and pass the ownership along.
6. Are sub-groups or linked groups deleted automatically with the main group?
No, each of these is separate. If you want these deleted, they need to be deleted separately.
7. Can I recover a Facebook group after I delete it?
Only within the 30-day grace period. After this, it’s gone. If you think you might change your mind, it’s better to use the archive function.
8. Can I transfer group ownership to someone else instead of deleting?
Yes, this is possible. You’ll need to hand it off to another admin. If you already have an admin you want to hand it off to. If not, you’ll need to choose a member and make them an admin.
Once they are admins, find their name in the member list. Then make them the “Primary Admin.” this hands over full control of the group. If the original owner leaves, the group will continue with that person as the main admin.
9. Does deleting the group also remove its connected Messenger chats?
No, group and individual chats may still exist after the Facebook group is deleted, since they are between Facebook members (and not owned by a group).
10. How long does it take for Facebook to remove the group from search results?
On Facebook, a group will disappear instantly after the 30-day grace period. It may take longer on Google, as Google de-indexes your group from their search results.
11. Is there a way to download my member list and their email addresses before deletion?
You can download a member list with names and Facebook profiles. But you can’t download emails. Facebook doesn’t provide these. It’s important to try to collect emails separately from Facebook, since you don’t actually retain any way to contact your members if your group disappears.
12. What happens to all past posts, photos, and files once the group is gone?
If you choose to delete, everything is deleted.
13. What if my group has scheduled events—are they canceled automatically?
Yes, every event connected to a group is deleted. Event attendees will not receive a notification that the event is cancelled. If you want to continue an event after cancellation, you need to get attendees off of Facebook, either by collecting emails, creating an Eventbrite page, or moving to a community platform.
14. Why won't Facebook let me delete my group even though I'm the admin?
Here are some common reasons this happens:
You’re an admin, but not a “Primary Admin”.
You haven’t deleted all members and other admin.
There’s still an existing “Shop” page in the group.
There are still pending member requests and scheduled posts.
`15. Will members get a notification when the group is deleted?
No, they simply lose access.
Ready to start building your community?
Start a free 14-day trial to explore Mighty—no credit card required.
More like this
Join Mighty Community
Learn the principles of Community Design™ (and see them in action) alongside thousands of creators and entrepreneurs. It's free to join!
Online Courses
Creating a Course
Teaching a Course
Course Platforms
Selling a Course
Communities & Memberships
Community Platforms
Managing a Community
Building a Community
Growing a Community
Monetizing a Community
Content Creation
Creators & Entrepreneurs
Monetization
Content Creation
Starting a Business
Website Builders
Creating & Managing a Website
Events
Event Platforms
Hosting & Marketing Events
Branded Apps
Creating a Mobile App
Coaching Apps
Community Apps
Coaching
Mastermind Groups
Starting a Coaching Business
Coaching Platforms
Filter by Category
Online Courses
Communities & Memberships
Creators & Entrepreneurs
Events
Branded Apps
Coaching
Start your free trial
14 Days. No Credit Card Required.

